Dec 21, 2011

Deck the halls!!

Sharing some of the ornaments that are going up on my tree this year (as soon as Im able to put the tree, lol!) My life is full...full of joy, peace...also, full of kids, messes, parties and laundry!! An extra-ordinary life in the midst of routine chores. I just escaped for a few minutes to share with you some of my ornaments. Ask me if you have any questions!! love you much....check out my store at www.rememberj.stampinup.net for the awesome CLEARANCE BLITZ, dont miss it!!!


Stamp sets used here: Pines and Poinsettias, Holiday Hand-Penned, Word Play, Teeny Tiny Wishes.

Have a beautiful time with the Lord Jesus celebrating the day Father God sent Him to the world. We are so blessed by His coming, my life would be so empty, boring, lost without my Saviour.
Merry Christmas and tx for looking!!

Dec 14, 2011

Time flies

Hello my dear friends,

Life is going way too fast but today I found a breather to come post a few pics of the projects we made in my Flipbook/Explosion Box class last Saturday. We used the wonderful Scrappin Kit Christmas Lane which is found in our Holiday Mini catalog. Stampin' Up! comes with so many good ideas. Hope you like these and get inspired!!

We also used the Scallop Envelope Die and Real Red and Wild Wasabi buttons.

Word Play stamp set added the right touch to the center of the box inside and the Two Tags die
for the tag on the left hand side.


Hope to hear from you soon. I resolved to pace myself in the next months, so I won't be offering many classes at the moment, will continue with my clubs and hopefully keep posting more consistently. It's been a busy season in my life...God bless you tons during this Christmas season and always. Leave me your love with your comments. Visit my store at www.rememberj.stampinup.net Surely you will find what you need for your next project. Consider buying it from my website!!

Big hug,
Jessica U.

Nov 26, 2011

One more turkey!!!

If everyday  we are to give thanks...then everyday is a good day to eat (or make) a turkey. The day before thanksgiving I decided to make a craft with my daughters. My oldest picked she wanted a turkey...so here comes the owl punch, scallop punch and word window punch to help. Gobble, gobble, gobble...I had fun!! I used the spinner technique, so the turkey spins from one side of the card to the other. Funny!!!
Many Blessings!!!

Nov 24, 2011

Happy Thanksgiving!!

Just came back from sharing with some awesome friends, the family God picked for us in Lubbock!! Thanks John, Jen, Sarah and rest of the crew for having us over today. It was a real blessing!! It's been a busy bee month, but little by little Il share all the cool stuff Ive been learning this last month. Yes!!! Is more than a month since my last post, soooryyy!! Just really focused on my clubs, classes, and blessed to have met so many creative friends in my last October class. Later this week Il share some pics of how was my October. For now, just a bit of inspiration (more like wanting to share) from a thankful heart. He has been good, His love endures forever. I have so much to be thankful for. Thank you Lord!!

Just getting creative with my wheel. I inked it well on my Old Olive Stamp pad, then "erased" some of the wording with a wipie  -thou you could use a Q-tip or your blender pen- and inked "Gratitude can transform common days" with a Tangerine Tango marker. I punched three circle from the Itty Bitty Punch and top it with the Itty Bitty buttons. Great match!
Stamp sets used: Awash with Flowers, Bright Blessings Jumbo Wheel

This morning I wanted to bring something for the kids to share. So I made some "Sour Cream Containers" . Instructions down below. They are easy to make and hold a good amount of treats. Stamp sets used: Fox & Friends, Cute by the inch (retired). Love the mix of the Island Indigo and Pumpkin Pie colors. Dsp is Non-SU but just had to put it all together with my new favorite hue of blue. Fun!! Oh, 5 chocolate kisses inside and voala!!

Instructions:
1. Cut your dsp at 4 1/4" x 5 1/2"
2. Place Sticky Strip adhesive on two sides, the long and the short.
3. Take the two short edges and adhere together.
4. Then put together one of the short ends (the one with adhesive)
5. Insert each end into your crimper and turn handle 2-3 times only,
remove and do the same on the other side.
6. Make two holes on the end without Sticky Strip
7. Place your goodies inside
8. Place your ribbon from behind thru one hole and then from the front
9. Now trade opposite side of ribbon and thread thru the holes from back to front.
10. I stamped my images on Whisper White CS
11. Punch images with your 1 1/4" circle punch
12. Punch a coordinating color CS with your 1 3/8" circle punch
13. Punch a  Scallop circle on Whisper White.
13.Adhere together.
 I placed a Stampin Dimensional between the Colored CS and the scallop circle
and on the back of the scallop circle. Do similar with your Square punches ad Scallop
Square punches.
Love it!!


Let me know if you have questions. Leave me your love with your comments!! And come back this week for more. Have a beautiful season searching for the true meaning of Christmas....Christ! Blessings!

Jessica U

Oct 13, 2011

Kindness Matters

Loving this stamp set soo much, so many ways to use it. I hope you get yours out and try this layout. I followed the layout for  challenge SCCSC87 in Stampin Connection. First time I actually try a challenge. It was fun!! This one is for the most important woman in my life. My dear mother!! She loves when I send her cards I made. Do you think she will like it? :-)

Leave me your love with your comments and let me know how can I bless you!!
Blessings,
Jessica U


Instructions:
1. Cut a piece of Perfect Plum CS 11" x 4 1/4" scor and fold at 5 1/2" horizontally.

2. Cut a piece of Soft Saffron 5 1/4" x 4" for the front

3. Cut a piece of Whisper White at 5 1/4" x 4" for the inside.

4. Punch a piece of 2" x 4" Wild Wasabi CS with the new Lace Ribbon Border Punch. Is beautiful!!
5. Punch 2 Whisper White 1" circles and 3 Perfect Plum 1" circles.

6. Color your center butterfly from KINDNESS MATTERS stamp set with your Perfect Plum marker and stamp on a scrap piece of Whisper White CS. Punch with your 1 1/4" circle punch and mat on a Perfect Plum 1 3/8" circle.

7. Clean your stamp well and color the next butterfly with your Wild Wasabi
marker. Stamp as shown on the So Saffron 5 1/4" x 4" CS.

8. Do the same with the 3rd butteefly, this time in Perfect Plum.

9. With the help of your stamp-a-magig position your sentiment from HAPPIEST BIRTHDAY WISHES on the top left corner in Perfect Plum Classic Ink.

10. Stamp your inside piece of Whisper White with the Butterfly stamp on the bottom on Wild Wasabi. Pretty!!

11. Assemble your card, starting with your LACE RIBBON BORDER, placing and adhering the 1" circle on the back before doing it on the So Saffron piece.

12. Adhere you big butterfly with a Stampin Dimensionals (love them!!) and finish it all with Bling! Place Rhinestones Jewels as shown in the picture.

** If you dont have this set, try following the same layout with one of yours and Be creative!!**

Oct 11, 2011

Fall is here!!

I am so glad the cool weather is coming thru. Im also starting to feel the rush rush of the Holiday season aproaching, not good, hum! I am purposely going to slow down this year. :-) Let's stop and "smell the roses" and be determined to enjoy every moment God gives us to enjoy. He is good and His love endures forever. There is one very special lady in our church that we all love. She works soo hard in all the administrative things that have to be done and seems to me she is always there when I need her. So awesome!! I made this small gift for her last month. They gave us the opportunity to thank her for all she does so I made my very first Explosion Box. She loves Fall colors, so I grabbed some of my Fall Dsp from last year. (I kept it for something special) and made this. Hopefully I can make a nice tutorial on how to make this one after my October 22nd cards class. Check more info  Don't miss it!! Will be fun!

Anyway, here is my take on the explosion box. I sure hope she liked it (I think she did) :-D Leave me your love with your comments and visit my store HERE.

Blessings,
Jessica U.


Oct 10, 2011

Is Time to say Thanks

Hi again!! Hope someone is actually reading my posts, lol!!! No comments yet. None in the lasts weeks. :-( I love your responses. Let me know if these ideas are inspiring you in some way or if there is a specific type of project you would like to see. Is easy to place a comment, just click on Post a comment at the bottom of my post and follow the instructions. :-) Anyway, does it happen to you that at times you have so many people to be thankful to that you have not enough time to create cards you wish to give them . Yikes!! I already thought of a few more I "owe" a thank you. I am so blessed to have such amazing friends around me with only one year in my current dusty, dry, WONDERFUL Lubbok, Texas. :-D Yeap! I love this place. Anyway, here a couple of thank you notes for a couple of amazing ladies God placed in my life. They simply ROCK!!


INSTRUCTIONS:
Cut two Top Note die cuts, one with cardstock and one in a coordinating Designer Series Paper. Score the DSP one @ 1 1/2" and fold down to reveal the opposite side of the paper. Adhere close to the edges of the front of your cardstock with your preferred adhesive. Tie a piece of ribbon to the front with or without a bow. For the inside cut a piece of 2" x 3 1/2" Very Vanilla CS and mat on a piece of 2 1/4" x 3 3/4" Pumpkin Pie (in this case). Stamp your piece of VV CS with your preferred stamp set and place a brad on the top holding a small piece of ribbon to pull. Hope you enjoy it.

I learned these ones from my fellow demonstrator and friend Renee Hobbie. You can see her sample HERE.
Thanks Renee!! I had fun making these ones.

Oct 7, 2011

Ready for Christmas??


I am having a wondeful Christmas cards class planned for you on October 22nd at 10am. Send me an email if you are interested to jessy_cruz@yahoo.com Would love to have you over. If you come is $20, but if you invite a friend that registers then you are $10. Even better if you bring a second friend, your class is free. Don't miss it!! This class is tailored for the begginner to advanced. Hope to hear from you soon. Will be making my materials order in the next wek.
Many blessings!!
Jessica U

Oct 6, 2011

Creative Friends

Hello!! I super need to share this with you today. God has been so good to me to put by my side ladies that are full of His creative power. I decide to download some cards some ladies from my Clubs gave me in the last weeks. I am in awe of their creativity. So today I honor them!! There names are Brandi Evans, Jennifer Bailey and Cindy Herbet. Thanks for blessing me with these my sweet friends. You made my day. God knew I needed a lift, and He sent you!!

Enjoy!
This is from my wonderful friend Brandi Evans. First time stamping!! Can you believe it? She is awesome. My watermark says was created by me, but no, it was all her idea. These are from her first Stampin Up order. Im impressed!

These two are from my sweet sister Jen Bailey. She came one Saturday and started experimenting. Voila!! These came from her, aren't they amazing? She made me one with my initial. :-)


Last but not least, Cindy Herbet surprised me yesterday with a card during Club. I realized I could make a different watermark, so I did with hers. She has no idea how much it blessed me to know she was thinking of me. I so like "homemade" cards. I can't remember when was the last time I bought a card at the store. Haha!! You made my day my friend. Thanks Lord Jesus for amazing ladies surrounding me and encouraging on my journey. I am simply blessed!

Jessica Urrutia

Oct 5, 2011

My favorite stamp (this month!!)

Ok, so my favorite stamp changes from time to time, but for sure this one is sticking for longer than usual. So Il start sharing with you what Ive been coming up with. Here I made a post it note holder and I covered a regular Composition notebook with the beautiful FOREVER YOUNG Stamp set and the gorgeous designer series paper Timeless Portrait. What do you think? Isnt it pretty?? I'm so glad I got this Stamp set, is just fun to work doing what you love and I love stamping!!!
God bless and check out more ideas going to the left side bar where there are samples of every stamp set listed.
Leave me your love with your comments and let me know how can I help uuuu...here to serve you!

Jessica Urrutia

Stamp set: Forever Young, You're a gem
Cardstock: Cherry Cobbler, Very Vanilla
DSP: Timeless Portrait
Ink: River Rock, Cherry Cobbler, Basic Black
Embellishmens: Crochet ribbon, Basic Black Satin ribbon, Basic Rhinestones, Antique brads (love them!!), Neutrals brads, Jumbo eyelets (retired)
Tools: Cro-A-Dile, Big Shot, Top Note die, Vintage Wallpaper Embossing folder, Scallop Circle Punch,


Stamp set: Forever Young, You're a gem, Just perfect alphabet
Cardstock: Cherry Cobbler, Very Vanilla, Basic Black, Crumb Cake
DSP: Timeless Portrait
Ink: Cherry Cobbler, Basic Black
Embellishmens: Crochet ribbon, Basic Rhinestones, Neutrals brads
Tools: Big Shot, Top Note die, Decorative Label Punch, Vintage Wallpaper Embossing folder,1 1/4" and 1 3/8" Circle punches, Boho Blossom Punch, Scallop Trim border punch (Yikes! I love punches)


Oct 3, 2011

Card of the Month RememberJ1

Well, October is here!! Is time to show you a few new things Ive been working on. So...ready? Yes!! Today Il show you my October Card of the Month. Is simply a simple layout I will show in several cards with several different stamp sets during this month. I'm hoping you can share your own art using this layout. Be free to change the shapes or location of certain things. For example in some cards I place the sentiment to the right, in others I placed it on the center. Be creative and have fun. Hope these ones inspire you a bit or a LOT to start creating!! Il be back to show you more ideas tomorrow. Call or email me if you have any questions...would love to hear hear from you!

Love you, tx for visiting my blog!
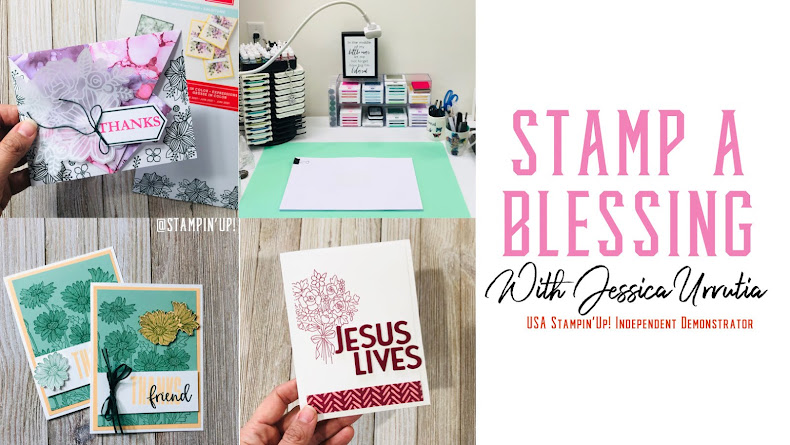
Jessica Urrutia

You can email me your creations to jessy_cruz@yahoo.com and Il be posting them on my blog.
Card size is 5 1/2" by 8 1/2" scored and folded at 4 1/4" on the long side. Center Basic Black mat is 5" by 2 1/4" and the Timeless Portrait DSP is 4 3/4" by 2". In the other ones I vary the sizes a little. You could do the same. Be creative!! Many Blessings!!!

Stamp set: Awash with flowers, Fabulous Phrases
Ink: Pacific Point Classic Ink, Cherry Cobbler Classic Ink
Cardstock and Paper: Crumb Cake CS, Whisper White CS, Cherry Cobbler CS, Basic Black CS, Timeless Portrait DSP
Embellishments: Rhinestones
Tools and other: Tabletop Paper Cutter, Modern Label Punch, Word Window Punch, 1" Circle Punch, 1 1/4" Circle Punch, Itty Bitty Shapes Punch Pack, Stampin Dimensionals, Corner Rounder Punch
Stamp Set: All in the Family, Family Phrases (retired)
Ink: Chocolate Chip Classic Ink
Cardstock and Paper: Baja Breeze CS, Tempting Turquoise DSP, Whisper White CS
Tools and other: Tabletop Paper Cutter, Modern Label Punch, Word Window Punch, 1" Circle Punch, 1 1/4" Circle Punch,Itty Bitty Shapes Punch Pack, Stampin Dimensionals

Stamp Set: All in the Family, Family Phrases (retired)
Ink: Chocolate Chip Classic Ink, Melon Mambo Classic Ink
Cardstock and Paper: Baja Breeze CS, Melon Mambo Brights Collection DSP, Whisper White CS, Melon Mambo CS
Tools and other: Tabletop Paper Cutter, Modern Label Punch, Word Window Punch, 1" Circle Punch, 1 1/4" Circle Punch, 1 3/8" Circle Punch, Stamp-a-magig, Stampin Dimensionals
Embellishments: Rhinestones

BTW!! Check the Awesome New Promotions Stampin Up! has in October. Amazing!!! Click on them to your left on the sidebars. :-))

Sep 1, 2011

The Holiday Mini is here!!

Hi my dear stampers!! At last the New Holiday Mini Catalog is on. Starts today Sept 1st and goes on through January 3rd, 2012 so don't miss any of these wonderful stamps and projects. Click on the pdf below to take a look. I also laced a link with the supplies for all the wonderful ideas inside.

Let me know how can I help you with all your creative needs. Il be posting more ideas here soon. Getting ready for my Ladies Night Club tomorrow and my Chritmas Cards class October 22nd. Is gonna be fun!! Yeehaa!!

Aug 25, 2011

Kindness matters

Hello my dear friends! Yikes! It's been a while I havent' post a thing. Sorry, life happens!! Anyway, Ive been creating in my downtime (ok, I dont really have a downtime, but I make it happen). Im in love with this sweet stamp set. Is a set of about 5 images that I believe you will totally like. The name is Kindness Matters. (Click on the link to see it) Check out my latest creations. The first is a bookmark using the TWO TAGS die and the BEAUTIFUL BUTTERFLIES die. I incorporated the elegant images from Style Beautiful in both samples. The second is a card set I created for a special lady in my life. Her favorite color is white, so I had to be creative. :-) I had to try one with a bit of color though. That one I kept to myself. Hehe!!
Leave me your love with your comments and if you get inspired go visit my store at www.rememberj.stampinup.net
Email me if you have ANY questions, would love to help you with your next project.

Blessings,
Jessica U
jessy_cruz@yahho.com


Aug 13, 2011

Sorry!!

Not long ago I felt like I did something wrong toward a sweet friend. Not intentionally but I believe I offended her. Feeling awful I made this card for her to apologize for my wrong doing. Indeed she forgave me. Uf! Here I share one of my favorite stamps: AWASH WITH FLOWERS. Seems like I can't put it down. With the help of my SQUARE LATTICE  embossing folder and my CRIMPER I made a combination of textures that I hope inspire you to create an array of flowers for those you made sad, or those you made happy.

Today is a good day to pursue peace, forgive those who hurt you, ask those you hurt to forgive you.
Blessings!
Jessica U.
www.rememberj.stampinup.net

Aug 12, 2011

Forever again!!

Click on the picture to see full size :-)


Have mercy!! I keep brainstorming ideas with my new fave "Forever Young". In this one I decided to add some color with  SOFT SUEDE AND PEAR PIZAZZ Markers to the trunk and the leaves after I stamped it in EARLY EXPRESSO. Then I glued little punched dots-from the OWL PUNCH smaller circles- in CAJUN CRAZE cardstock. Still I kept adding more details so I look for my CRYSTAL EFFECTS and a round toothpick. I put just a little on top of each dot and also "crystalized" the flower with it. You have no idea how much I like this stamp set. :-)

Hoping you get inspired...is all in the little things! Remember when things were simpler, cleaner, calmer...enjoy the little things of life and bring back the good memories. The ones that make you who you are.

Leave me your love with your comments and visit my store at www.rememberj.stampinup.net

Hugs,
Jessica

Aug 9, 2011

Owls & more owls!!

Ok, sooo lately I got to play with my new Owl PunchYeah!! So cute! Im posting today my first two projects. Hope you like them and go get one. There are so many cute "stuff" to make with this owl punch. Stay tune for more...


Leave me your love with your comments and go visit my store at www.rememberj.stampinup.net
Would love to be your Stampin'Up demonstrator!

Blessings,
Jessica Urrutia

Jul 29, 2011

Hostess Jar

Hello again!! Yesterday we had a wonderful time at my Open House with all my new club members. It was fun and refreshing to see them all having fun and exploring their catalogs and tools. Fun, fun!! Here is the jar I decorated for the Hostess to pick their hostess benefits month. :-) They all like it! I used the ornament punch, crystal effects and some pearls from a broken necklace to created the rose. The leaves are also the Ornament punch folded in half and passed diagonally thru the crimper. For the side flowers I used the scallop circle punch and the Boho blossoms punch. For the border I used the Scallop Trim Border Punch What do you think? Leave me you love with your comments and visit my store here.

Would love to hear from youuu,
Jessica U.


LinkWithin

Related Posts Plugin for WordPress, Blogger...